IMC - Intelligent Multicolor System
- Realtime Multicolor System
Many professional laserprojectors use more than 3 lasersources today.
So beside the common 3 lasers for red, green and blue, they use yellow and/or cyan lasers, for example OPSL-lasers to expand color gamut.
But how to control such a projector by the show software?
In the past, most software used color palettes. This means that each color output channel corresponds to a specific color in a table. The operator or show programmer had to create long tables (palettes) for the specific laser projector. But handling of such palettes was difficult. When the show should be displayed by the use of another projector, another palette had to be created to match the colors.
Today, most modern software uses primary RGB-colors like every computer screen uses when drawing a picture. This worked fine as long as most laserprojectors had not more than 3 color sources. Each color from the computer screen is directly output to the corresponding laser channel.
But this does not work when using more than 3 colors in a laserprojector.
Our software Dynamics now uses a new technology, called IMC (Intelligent Multicolor System).
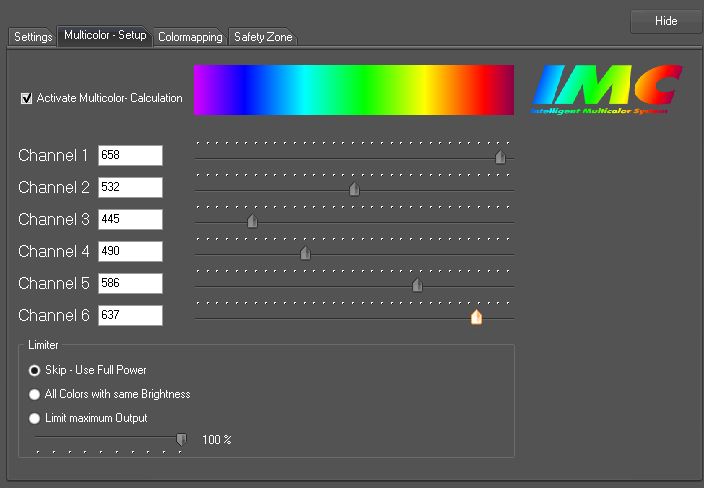
The goal of this development was to allow the operator the use of up to 6 laser colors of his choice. The user interface is simple: Just set up the color or wavelength of your lasersource with a slider. That's it!
A wavelength display next to each slider and a spectrum bar on top helps to identify the selected color for each laser built in the projector.
The colors set up here are the basic laser colors of the laserprojector. These are also called 'color channels' because each laser is controlled by a separate signal line ('ILDA-connector').
So if you use just 1 channel, and for example set this channel to red, the complete lasershow is output in red, if a red laser is built into the projector.
When using 2 lasers, red and green, all red parts of a show are displayed in red, the green parts are displayed in green and the mixture is displayed in yellowish shades.
This all sounds easy. But what to do with show parts created in blue?
In the past, all blue parts of a show were just missing when using a red/green laserprojector. So the blue parts had to be mapped to red or green manually using the colormapping matrix or by changing the colour palette.
Using our new technology, the blue parts are automatically mapped to both lasers red and green, resulting in mixed colors between red and green. So all showparts are displayed completely.
With the new IMC-technology, the operator doesn't need to care about choosing the right color palette. IMC makes shure that all showparts are displayed by the projector, no matter what laser source it uses.
To give the user the choice between showing all parts of the show or showing just the parts with the dedicated projector colors, IMC can be bypassed. When deactivated, the software uses the internal RGB-colors routed directly to the output channels, like it was done in the past.
An example: A projector uses 5 colors, red, green, blue, yellow and cyan.
Once all 5 lasers were set up in IMC, all colors of the show are routed to the right colour channel. So a yellow part of the show is not displayed as a mixture of the red and the green laser, it is displayed just by the yellow laser. The same happens with cyan.
All color shades between are mixed automatically.
IMC calculates the colors in very high resolution and gives a theoretical possible number of more than 250 Millions of different color values.
My show colors don't look the same like they did with an RGB-projector.
When I diplay yellow with my yellow laser, some red is mixed to the color.
Is something wrong?
No! It is very important to understand that IMC uses the available laser colors of a projector to reproduce the original RGB colors the show was created with. So if a show frame or picure was drawn in yellow, IMC recalculates the colors from the given wavelengths to reproduce the yellow color. When a 580nm yellow laser was set up, IMC adds some red to match the primary yellow.
The primary colors (Red, Green, Blue, Yellow, Cyan) used to draw a picture in the software are represented by the following wavelengths in IMC:
Red = 650nm
Yellow= 600nm
Green = 550nm
Cyan = 500nm
Blue = 450nm
If you set up these wavelengths with the laser wavelength sliders, the primary colors are output to the corresponding color channels without any recalculation. No matter what the 'real' wavelenght or color of your laser is.
So a yellow drawing (RGB drawing value R100%, G100% and B0%) will be displayed by controlling the color output channel for the yellow laser only. The color channel for a green laser is used to display a green drawing, when the wavelength is set to 550nm etc.. Otherwise some other colors are mixed to each output.
If your projector uses colors which do not match the primary RGB-colors, IMC will mix other colors to reproduce the primary colors as near as possible.
As a result, some colors can look a bit different from what you remember from using just an RGB-projector and a software without IMC.
But once you select the primary colors from the table above, the basic colors of the lasers will not be changed. So blue will be displayed as 410nm violet and red will be displayed as 635 orange, if the projector has these lasers built in and the wavelengths for primary colors were selected.
The colors in this case are not 'real' RGB colors because 410nm is not blue.
Because IMC allows the input of wavelengths without any restriction, the user can manipulate the colors for his specific need in a very easy way.
You can setup your system in 2 different ways:
1.When setting up the real wavelengths of the lasers as preset for IMC, the primary colors (RGB, Yellow, Cyan) can be look slightly different as they look without IMC.
But the resulting colors will match the RGB-colors of the drawing as good as possible.
2.When setting up the primary wavelengths (see table above) as preset, the system will not correct the color of the lasers built in the projector to show the primary colors.
So in case of the yellow 580nm Laser, yellow will be displayed as greenish yellow
or in case of a true 410nm laser which was set up as 450nm, blue will be violet.
Because all calculations in IMC are done in realtime, it is possible to change the given laser colors while a show is running. This makes it easy to adjust multiple projectors on stage, so the colors match as close as possible.
Restrictions
Depending on the laser colors in the projector, not all colors can be displayed correctly.
Think about a projector with just a red and a green laser. Naturally this projector never can display blue!
Note:
Magenta is not a color of the spectrum. Magenta always is the mix between red and blue.
There is no wavelength in the spectrum representing magenta, so you cannot set up a magenta colored laser in IMC.
How to do a white balance using more than 3 colors
Normally, white can be created by just mix primary red, green and blue.
When your projector has more than 3 colors, a white balance must be done using all available colors because a picure drawn in white will cause all available color channels being switched on.
Once set up the available laser colors in IMC, the colors are displayed in the 'Settings'-tab of the hardware control center. While outputting a testframe by the software, you can adjust the response curve of each color channel to get the right white balance.
It is recommended to use a testframe like the one shown below. All primary colors are displayed as well as their shades from total brightness to dark.
RGB Testframe
The values 'MIN' and 'MAX' are to set up the minimum and maximum power levels of the laser (after clicking the corresponding channel button 1-6). The voltage display below the sliders shows the voltage of the channel signal. For example, if a laser has a treshold voltage of 0,5V ( = always OFF below a signal level of 0,5V), the level can be shifted up to 0,5V.
If one laser is too powerful to get a good color balance, its maximum level can be reduced using the 'MAX' slider.
The sliders right to the channel buttons will 'bend' the response curve of each laser to compensate unlinearity.
The colormapping matrix
Depending on the kind of output-hardware (DAC) connected, you can use the matrix to route or map the values of the color channels (or parts of them) to the 'physical' color channels of your hardware.
On top, all available color channels generated by the software are displayed and marked with their physical color. On the left, the physical output channels (ILDA-signals) are listed.
Note: The channel 'Intensity' is not an internal color, used by the software. It is created by this matrix. Normally, intensity represents all available channels. The default values is that 100% of each channel is mapped to the intensity output.
Colormapping default values
When using an interface card with less than 6 channels + intensity, you can map the specific colors the card should use. As an example, the EasyLase USB II card shares the same output signal for color number 6 and intensity. If you want to use color 6, you have to map channel number 6 (here:violet) to intensity output. All other channels have to be removed from intensity.
Note that there is no intensity signal available at the EasyLase USB II after using it as a 6-color device, because the total number of channels at the EasyLase USB II is 5+1.
Important: Once you have done all settings for your projector, save the settings!
You can choose a unique filename to identify your projector.
There are 2 options for saving and loading the settings:
Colorsettings are just the color settings for a specific projector.
For example, when the show must be controlled from Dynamics running on a different PC, you can load the colorsettings created on another PC instead of doing the whole setup procedure again.
Projectorsettings contain ALL projector settings used by the current show setup. This includes the color settings, the geometrical settings (size, offset..) and the safety zones of each projector as well as the track number, the projector is assigned to.
Once the name of the settings file matches the name ('friendly name') of the projector or output hardware, the settings will be automatically loaded at startup of Dynamics.
When shutting down Dynamics, the projectorsettings of all connected projectors are saved automatically under the name of the card and will be loaded again when restarting Dynamics (or reconnecting the hardware).
When a special setup should be used again at later time (for example a special stage setup), save the projectorsettings file under another name. So it will not be overwritten by Dynamics.